
Your Ultimate Guide to DIY Sensory Bottles
A DIY sensory bottle is essentially a sealed container filled with liquid and interesting bits and pieces that create a captivating, calming effect when shaken. On the surface, it looks like a fun craft for a rainy afternoon, but it's so much more. It's a powerful little tool for helping children with emotional regulation and sensory exploration.
Why Sensory Bottles Are More Than Just a Craft
It’s easy to look at a swirling bottle of glitter and see a simple distraction. In reality, though, these mesmerising objects are brilliant developmental tools that parents and teachers use to support young, busy minds. They give children a tangible focal point, helping them make sense of big emotions and improve their concentration.
When a child is feeling overwhelmed or a bit fizzy, handing them a sensory bottle can completely shift their focus. The slow, predictable drift of glitter or beads offers a gentle visual that helps to soothe their nervous system. This simple act gives them a moment to pause, take a breath, and pull themselves back together without needing complicated instructions. It’s a wonderfully practical way to introduce mindfulness from a very early age.
The Developmental Power of Sensory Play
The magic of these bottles goes far beyond just calming a tantrum. Playing with DIY sensory bottles helps children build crucial cognitive skills. As they watch objects float, sink, mix, and separate, they’re getting a hands-on science lesson in concepts like gravity, density, and viscosity. It’s this kind of interaction that sparks real curiosity and lays the groundwork for learning later on.
The main benefits really boil down to a few key areas:
- Emotional Regulation: It provides a healthy outlet for big feelings like frustration or anxiety. A good shake can be a great physical release, and watching the contents settle helps calm the body and mind.
- Enhanced Focus: The captivating visuals can help improve a child's attention span. This is especially helpful for little ones who have a lot of energy or find it tricky to sit still.
- Sensory Input: It offers a safe and contained way for children to explore different textures, colours, and movements, which is vital for their overall sensory development.
This chart breaks down the primary benefits that parents and educators see when they bring sensory bottles into playtime.
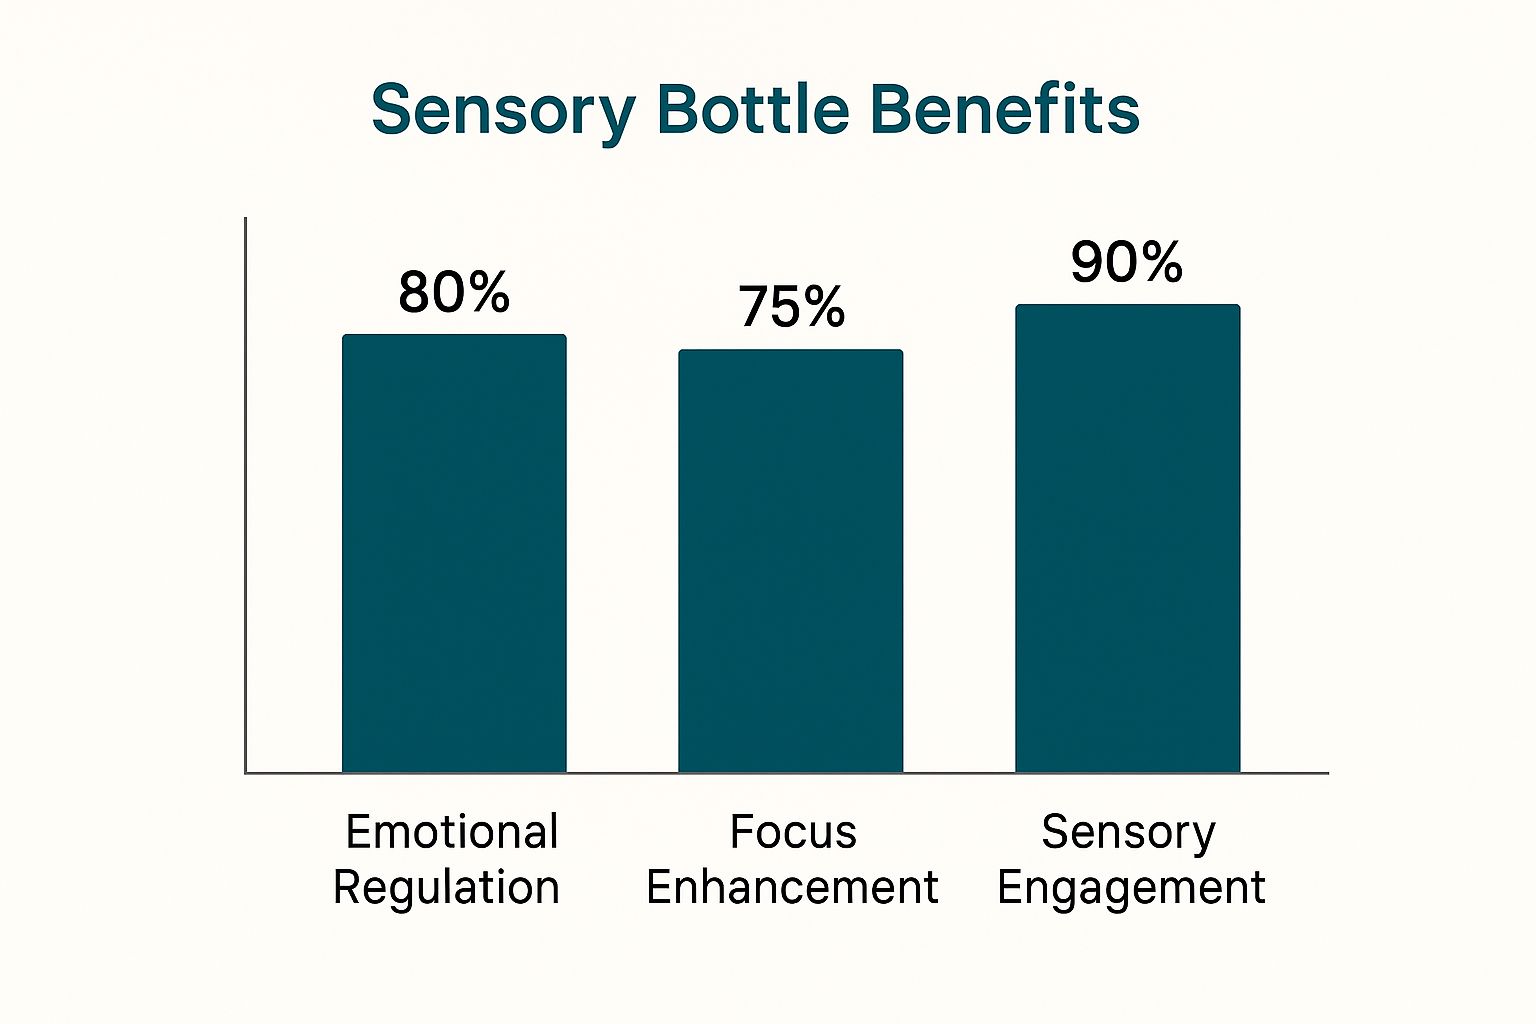
As you can see, sensory engagement and emotional regulation are far and away the most significant advantages of using these simple tools.
A Growing Tool in Homes and Schools
Sensory bottles have become incredibly popular across the UK, which makes sense given the growing focus on sensory integration in early childhood. It's not just a niche trend; the global market for toddler sensory bottles has ballooned to over USD 620 million, with huge demand coming from UK parents and schools.
In fact, around 52% of UK nurseries now use sensory play tools to support children's development, and nearly 40% of parents are using them at home to help manage anxiety.
When you make a simple sensory bottle, you’re not just making a toy. You're building a tool that fosters emotional intelligence, encourages scientific curiosity, and provides a moment of peace in a busy world.
These bottles are a cornerstone of effective sensory play. If you’re looking for more ways to create engaging experiences, you should explore our other sensory play ideas for toddlers. It's a simple project with profound benefits, making it an essential addition to any child's developmental toolkit.
Gathering Your Essential Supplies
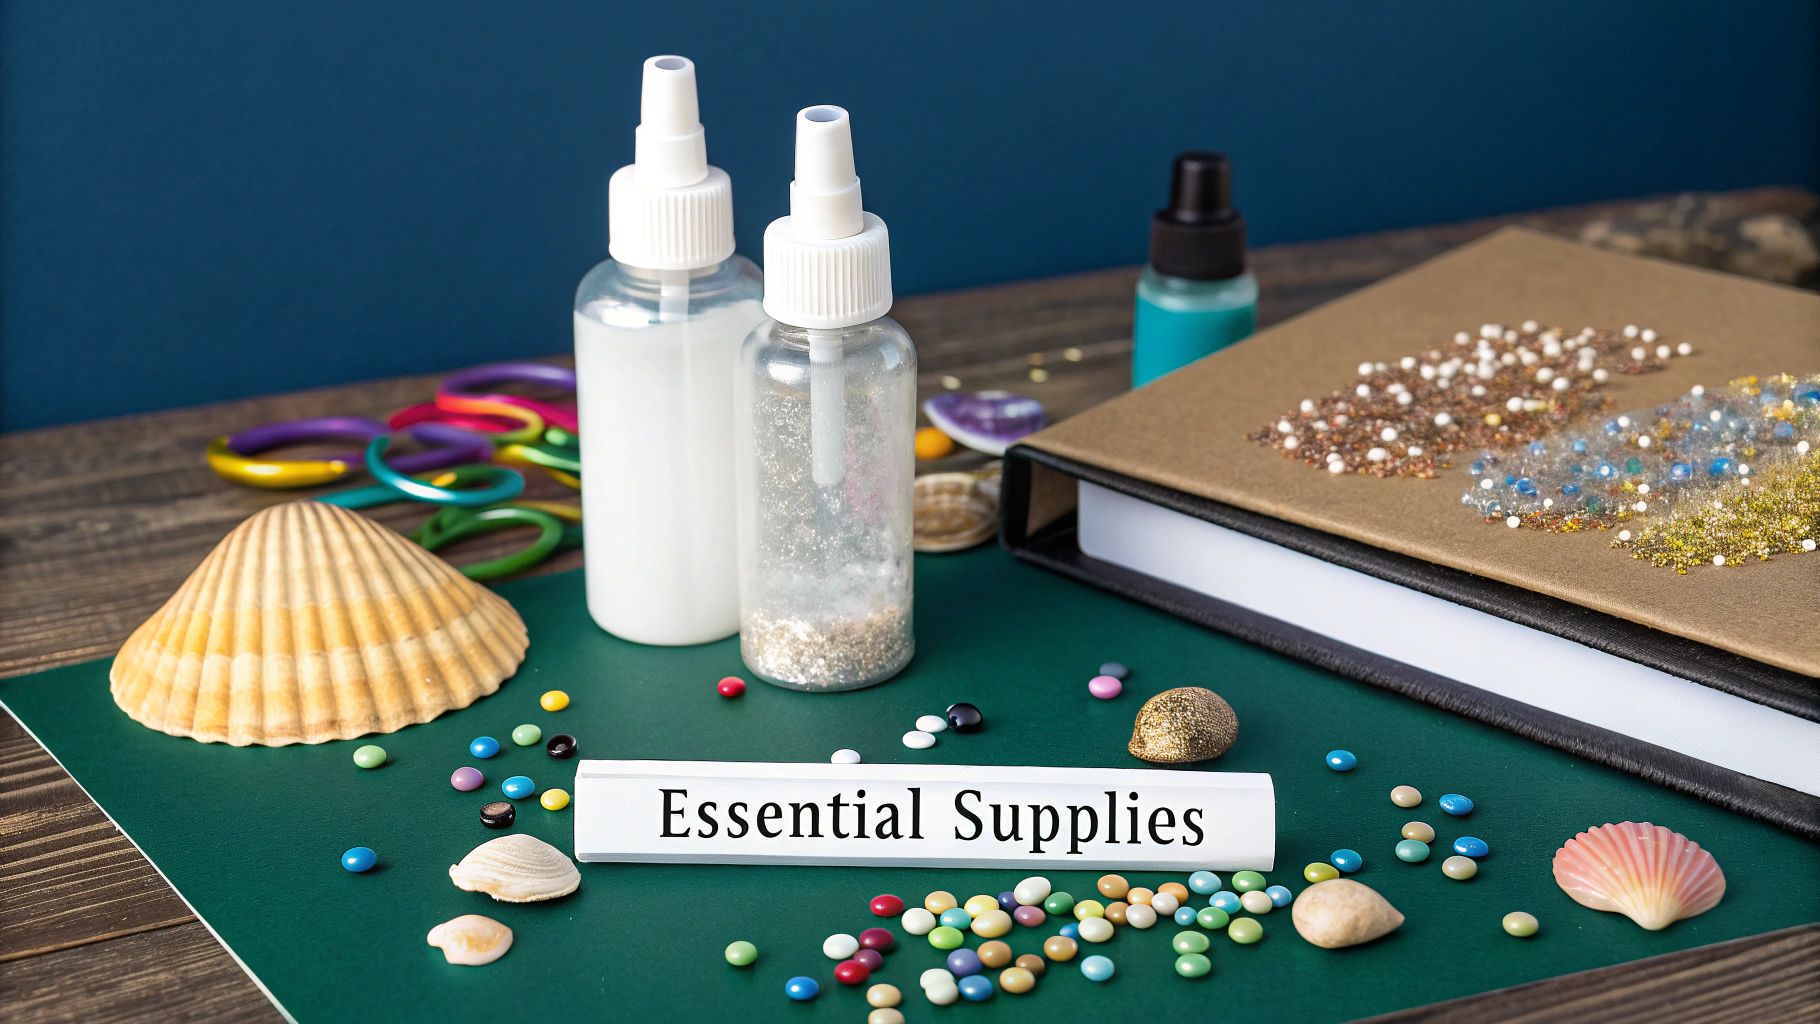
Before you can get lost in the fun of creating your own DIY sensory bottles, it’s a good idea to get all your bits and pieces together. Having everything laid out and ready to go makes the whole process a lot smoother, especially when you have enthusiastic little helpers joining in.
The great thing is, you probably have most of what you need already dotted around the house. I like to think about the supplies in three key groups: the bottle itself, the liquid that fills it, and all the fun things you'll put inside.
The Perfect Bottle: Your Sensory Canvas
The container you choose is the window to your mini world, so it's an important first step. While glass might look nice on a shelf, for anything a child will be handling, shatterproof plastic is the only safe option.
You don't need to buy anything special. A clean, recycled plastic bottle from water or juice can work perfectly.
- Voss Bottles: These are a classic for a reason. Their smooth, straight sides offer a brilliant, unobstructed view, and the wider mouth is a lifesaver when you're trying to get fiddly items inside.
- Recycled Drink Bottles: Any clear, sturdy plastic bottle can be upcycled. Just make sure you can get the label and any sticky residue off completely so it doesn't obstruct the view.
- Craft Bottles: If you'd prefer a fresh start, you can find bottles specifically designed for sensory projects at most craft shops.
Whatever you pick, give it a good wash and make sure it’s completely dry on the inside. Any leftover drops or residue can make your liquid look murky.
The Liquid Base: Setting the Pace
The liquid you choose completely changes the character of your bottle. It's the difference between a fast-paced, shaky snow globe and a slow, calming lava lamp effect.
Water is your starting point, but the real magic comes from adding something to thicken it up. This is what creates that mesmerising, slow-motion swirl that’s so captivating.
A great rule of thumb to start with is a 9:1 ratio—nine parts water to one part clear glue. But honestly, the best way is to play around with it. Add a bit, give it a shake, and see how you like the flow before you add your treasures.
Choosing the right base really depends on the effect you're going for. This table breaks down some of the most popular options I've used over the years.
Sensory Bottle Liquid Bases Comparison
| Liquid Base | Flow Speed | Visual Effect | Best For |
|---|---|---|---|
| Water + Clear Glue | Slow | Suspends glitter and small items beautifully | Classic glitter bottles, "I Spy" bottles with small floating items. |
| Water + Glycerine | Slow-Medium | Creates a very smooth, silky flow with less bubbling. | High-clarity bottles where you want items to glide, not just float. |
| Baby Oil/Mineral Oil | N/A | Doesn't mix with water, creating distinct layers. | "Wave" bottles (with coloured water) and density experiments. |
| Light Corn Syrup | Very Slow | Extremely viscous, items barely move. | Creating a calming, almost static display that settles over minutes. |
Each base has its own personality, so don't be afraid to experiment to find your favourite.
The Fun Part: Fillers and Sealants
Now for the best bit—deciding what goes inside! This is where your bottle gets its unique charm. You can use almost any small, waterproof item you can think of. It’s a fantastic excuse to have a rummage through your craft supplies.
Essential Items:
- Glitter: A sensory bottle staple. A mix of fine and chunky glitter gives a lovely layered sparkle.
- Strong Glue: This is non-negotiable for safety. Use a waterproof superglue or a hot glue gun to seal the lid on permanently. This is the most important step!
Creative Filler Ideas:
- Sequins, beads, and small buttons
- Tiny plastic toys like animals or alphabet letters
- Loom bands or chopped-up colourful straws
- Natural bits and bobs like tiny shells, seeds, or even lavender
- Water beads (they look amazing but must be securely sealed inside)
Once you've got your supplies laid out, you're ready to start building a sensory tool that's not only fun to make but will provide hours of calm and focus for your child.
Making Your First Mesmerising Calm-Down Bottle

Right, let’s get our hands messy and make a classic glitter calm-down bottle. This is the perfect one to start with, and the goal is to create that gorgeous, slow-motion swirl that makes these bottles so captivating.
Think of this less as a strict recipe and more like a fun science experiment. The "perfect" flow is really a matter of personal taste, but getting the liquid base right is the key to it all.
A great little trick is to use warm water. It helps the clear glue dissolve without any pesky lumps. Start by filling your bottle about halfway with warm water—not boiling, just warm to the touch.
Crafting the Perfect Swirl
Now for the magic ingredient that gives us that lovely, slow drift: clear school glue. A good rule of thumb to start with is a 5:1 ratio of water to glue, but don't be afraid to play around with it. The more glue you add, the slower and more mesmerising the glitter's descent will be.
Pour the glue straight into the warm water. It might look a bit cloudy at first, but that's normal. Just pop the lid on for a moment and give it a good shake until the glue and water are completely blended. This is your canvas, ready for colour and sparkle.
A few drops of food colouring or liquid watercolour are all you need. Remember, less is more! You’re aiming for a translucent colour that the light can shine through, not a dark, opaque liquid that hides all the good stuff inside.
Next, it’s time for the glitter. I find that using a mix of fine and chunky glitter gives a really beautiful, multi-dimensional effect. And trust me, use a funnel for this part unless you want to find glitter in your kitchen for the next six months.
A Pro Tip From Experience: Add one single drop of clear washing-up liquid to the mix. It's a simple trick that breaks the water's surface tension, stopping the glitter from clumping at the top and ensuring you get a much more satisfying, even swirl.
Sealing for Safety and Peace of Mind
This last bit is absolutely crucial for making your DIY sensory bottles safe for little hands. An unsealed bottle is a potential choking hazard and a guaranteed mess waiting to happen. Taking the time to seal it properly means you can relax.
Once you’re happy with how everything looks and flows, top up the bottle with a bit more water, but be sure to leave a small air gap at the top. This little space is what allows the contents to move freely when the bottle is shaken.
Dry the bottle’s rim and the inside of the cap thoroughly. Then, grab a strong, waterproof adhesive.
- Superglue: Run a thin, even layer around the threads of the bottle neck before screwing the cap on as tightly as you possibly can.
- Hot Glue: For this method, screw the cap on tight first. Then, run a generous bead of hot glue around the outside seam where the cap meets the bottle.
Whichever you choose, let the glue cure completely according to the manufacturer's instructions before you hand the bottle over. A securely sealed bottle is a safe bottle.
While glitter is fantastic, don't forget there are other materials that create wonderful effects. Water bead sensory bottles, for instance, are very popular here in the UK. Many parents and teachers use these small polymer beads, which swell up in water, to create a unique visual experience. Due to NHS safety advice on choking risks, these beads should never be used for direct play with children under three. However, sealing them inside a bottle makes them perfectly safe. In fact, surveys suggest around 15% of early years practitioners use them this way. It’s well worth exploring how to create safe water bead sensory bottles to understand the best practices.
Creative Sensory Bottle Ideas and Themes
Once you've got the hang of the classic glitter bottle, you'll realise that's just the beginning. Think of your bottle as a blank canvas, a tiny world waiting to be filled with whatever captures your child's imagination.
This is your chance to get really creative. If your little one is fascinated by dinosaurs, bugs, or even the changing seasons, you can create a sensory tool that's not just calming but truly personal and engaging. Tapping into their current passions is the secret to making a bottle they'll return to again and again.
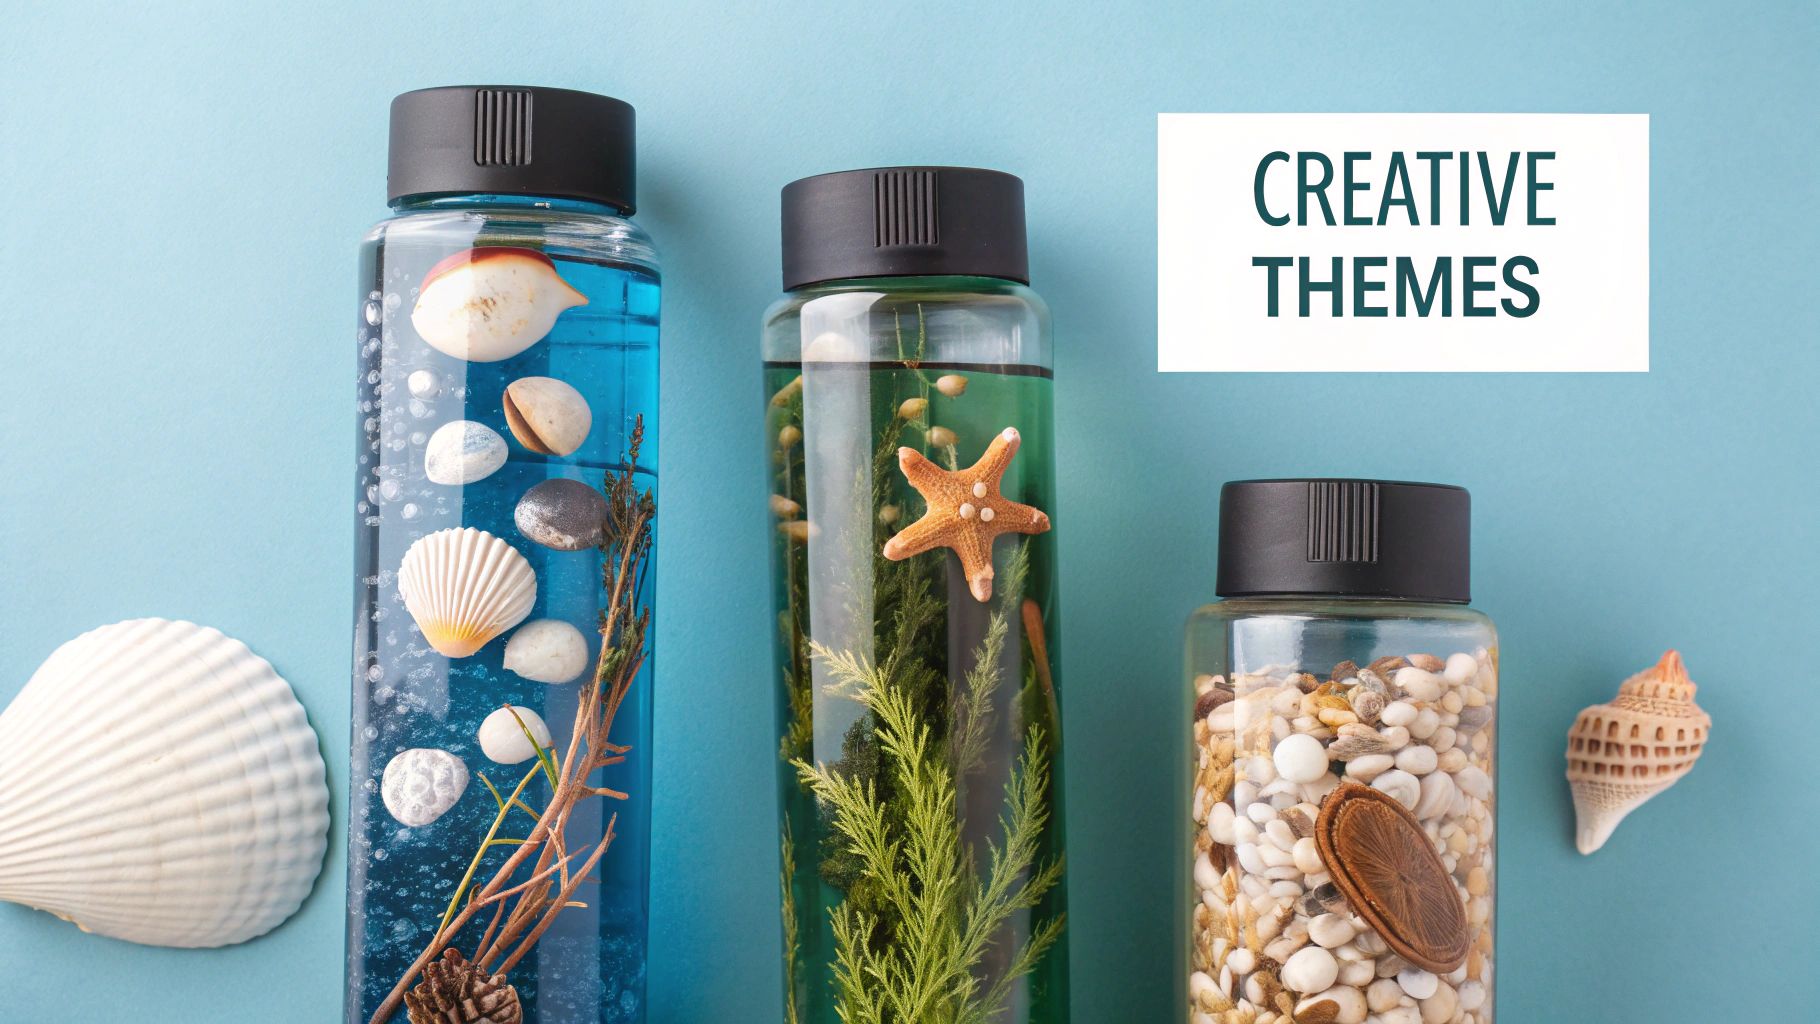
Ocean in a Bottle
Creating a miniature ocean is a classic for a reason—it’s completely mesmerising. The key is to use liquids that don't mix, giving you that beautiful, layered effect of sea and sky.
Fill your bottle about a third of the way with water and add a few drops of blue food colouring. Next, very slowly pour in baby oil or mineral oil to fill the rest, leaving a small gap at the top. The oil and water will stay separate, making gentle waves as you tilt the bottle.
Toss in some tiny shells, small plastic sea creatures, and a pinch of blue glitter to make your little seascape sparkle.
Nature Explorer Bottle
Why not bring a piece of the outdoors inside? This theme is a fantastic excuse to go on a nature walk, letting your child collect treasures for their bottle along the way.
For these, a simple base of clear water with a splash of glycerine works wonders, allowing the natural items to float and drift gently.
- Woodland Walk: Think small twigs, acorns, tiny pinecones, and interesting seeds.
- Garden Discovery: Try colourful flower petals (dried ones last longer!), smooth little stones, and green beads for leaves.
- Beachcomber's Find: A bit of sand, miniature shells, and tiny, wave-tumbled pebbles are perfect.
This kind of bottle does more than just soothe; it helps build a real connection to the natural world. If you're looking for more ways to use sensory activities for development, our guide on sensory play ideas for babies has some lovely inspiration.
Remember, the goal is to spark curiosity. A "Nature Explorer" bottle can become a fantastic conversation starter, encouraging your child to talk about what they found and where it came from.
Interactive Discovery Bottles
Some of the most engaging DIY sensory bottles are the ones that encourage hands-on play. They're not just for watching—they add a brilliant element of challenge and discovery.
A "Magnetic Discovery" bottle is a fantastic, simple introduction to science. Just fill a bottle with water, a thickener like clear glue, and a variety of small, magnetic bits—paperclips, pieces of pipe cleaner, and small jingle bells are great. Hand your child a magnetic wand and watch them learn how to move the objects through the liquid.
Another great interactive option is a "Sound Shaker". This one is all about noise, so no liquid is needed! Fill an empty bottle with a mix of colourful dyed rice, dried pasta shapes, and a few small bells. When shaken, it creates a wonderfully satisfying sound, letting your child explore their auditory senses.
Creative Sensory Bottle Theme Recipes
To get your creative juices flowing, here are a few more theme ideas you can whip up in minutes. These are tried-and-tested favourites that never fail to fascinate little ones.
| Theme | Key Fillers | Liquid Suggestion | Sensory Focus |
|---|---|---|---|
| Starry Night Sky | Silver star glitter, dark blue/black food colouring, small moon confetti | Clear glue and water | Visual tracking, calming |
| Construction Zone | Small pebbles, sand, tiny toy diggers or trucks | Water (or dry) | Auditory (shaking), imaginative play |
| Floating Alphabet | Foam or plastic letter beads, colourful pom-poms | Hair gel and water | Early literacy, colour recognition |
| Weather Watcher | Cotton wool balls (clouds), blue water (rain), shiny confetti (lightning) | Baby oil and coloured water | Understanding concepts, storytelling |
Don't be afraid to mix and match materials or come up with your own themes. The best sensory bottles are often the ones inspired by your child's own unique interests and discoveries. Happy creating
Adapting Bottles for Different Ages and Needs
A truly brilliant sensory bottle isn't just about what looks good; it's about what works for the child holding it. What captivates a four-year-old might completely overwhelm a baby, so tailoring your creations to their developmental stage is the secret to making them genuinely effective.
From Baby's First Glimpse to Toddler's "I-Spy"
For the littlest ones, simplicity is your best friend. Babies are just getting the hang of tracking objects with their eyes, so high-contrast colours are a game-changer. Think about using bold black and white ribbons or a few large, bright red pom-poms floating in a clear liquid. The key is to use fewer, bigger items to avoid visual overload, making it easier for their developing eyes to focus and follow the gentle motion. If you want to dive deeper into this, our guide to sensory toys for babies has some great insights.
Once they're toddlers, you can dial up the interaction. This is the perfect time to introduce an "I-Spy" bottle. Just fill a bottle with coloured rice and hide a collection of small treasures inside – things like alphabet beads, tiny plastic animals, or different shaped buttons work wonders. The challenge of shaking and turning the bottle to find a specific object is fantastic for building concentration. Plus, it's a great way to boost their language skills as you chat about what they've discovered.
Beyond the Toddler Years: Learning and Emotional Support
For school-aged children, sensory bottles can become a mini science experiment right in their hands. It’s a brilliant opportunity to explore concepts like density. A classic wave bottle made with coloured water and baby oil is perfect for this, as they can see how the two liquids never quite mix. Throw in a few small plastic sea creatures or a tiny boat to make it even more engaging. It’s a hands-on way to make an abstract scientific idea feel real and exciting.
These bottles are also incredibly powerful tools for children with specific needs, like Autism or ADHD. The slow, mesmerising drift of glitter in a calm-down bottle can provide a much-needed focal point, helping to soothe an overstimulated nervous system and bring a moment of peace.
For a child feeling overwhelmed, the sensory bottle acts as a safe anchor. It doesn't demand anything from them; it simply offers a quiet, predictable visual that helps them find their centre again. This simple act of watching can be an incredibly effective self-soothing strategy.
This focus on emotional support is a huge part of early childhood development. It’s something educational suppliers in the UK have really embraced, creating tools that help children connect with their feelings. For instance, some companies offer sets representing emotions like happiness and anger, which are now used in at least 35% of schools with special educational needs coordinators. Research has even shown that using these kinds of visual aids can improve a child's emotional literacy by as much as 27%, giving them a solid foundation for life. You can see great examples of how sensory tools support emotional awareness on TTS-Group.co.uk.
Your Sensory Bottle Questions Answered
Even with a project as fun as this, you're bound to have a few questions. When you're in the middle of making your DIY sensory bottles, it's common for a couple of little challenges to pop up. Getting those sorted ensures your creations are not just captivating but also safe and built to last.
Here are a few of the most common queries I hear from fellow creators.
How Can I Make My Sensory Bottle Totally Leak-Proof?
This is the big one, especially when little hands are involved. A leaky bottle is a messy disaster waiting to happen, so getting a rock-solid seal is non-negotiable.
The best approach I've found uses a two-step process. First, screw that cap on as tight as your hands can manage.
Then, you'll want to add a strong, waterproof adhesive to make it permanent. You've got a couple of options here:
- Run a line of superglue around the bottle's threads just before you screw the lid on for the final time.
- Alternatively, screw the lid on tightly and then seal the outside seam where the cap meets the bottle with a hot glue gun.
For that extra layer of security, some parents wrap the sealed cap with tough electrical tape. Whatever you choose, make sure you let the glue cure completely before handing the bottle over.
Why Is My Glitter Sinking So Fast?
Ah, the classic "glitter bomb" effect where everything just plummets to the bottom. If your glitter is dropping like a stone, it simply means your liquid isn't thick enough. To get that dreamy, slow-motion swirl, the glitter needs a denser medium to float through.
Thankfully, the fix is easy. You just need to add more of your thickener. Whether you're using clear school glue, glycerine, or light corn syrup, stir in another tablespoon, give the bottle a good shake, and see how it flows. Keep tweaking it bit by bit until you get that mesmerising, gentle drift.
Key Takeaway: There's no single "perfect" flow – it's all about what you and your child enjoy. A good starting point is often a ratio of around 5 parts water to 1 part clear glue, but feel free to experiment until it looks just right.
Are These Bottles Actually Safe for Babies and Toddlers?
When they're made correctly and always used with an adult watching, they absolutely are. Safety really boils down to three golden rules.
First, always use a shatterproof plastic bottle – never glass. Second, make sure every single item you put inside is too large to be a choking hazard if the bottle were to somehow break.
And most importantly, you must permanently glue the lid shut. This is the crucial step that keeps curious little explorers from opening it up.
At Grow With Me, we believe in the power of purposeful play. Our stage-based subscription boxes deliver high-quality, developmentally appropriate toys right to your door, taking the guesswork out of playtime. Discover how our curated kits can support your child's learning journey at shop.growwithmesubscriptionbox.co.uk.